From the “Event Calendars” admin panel, either open an existing Event Calendar or select “Add New.”
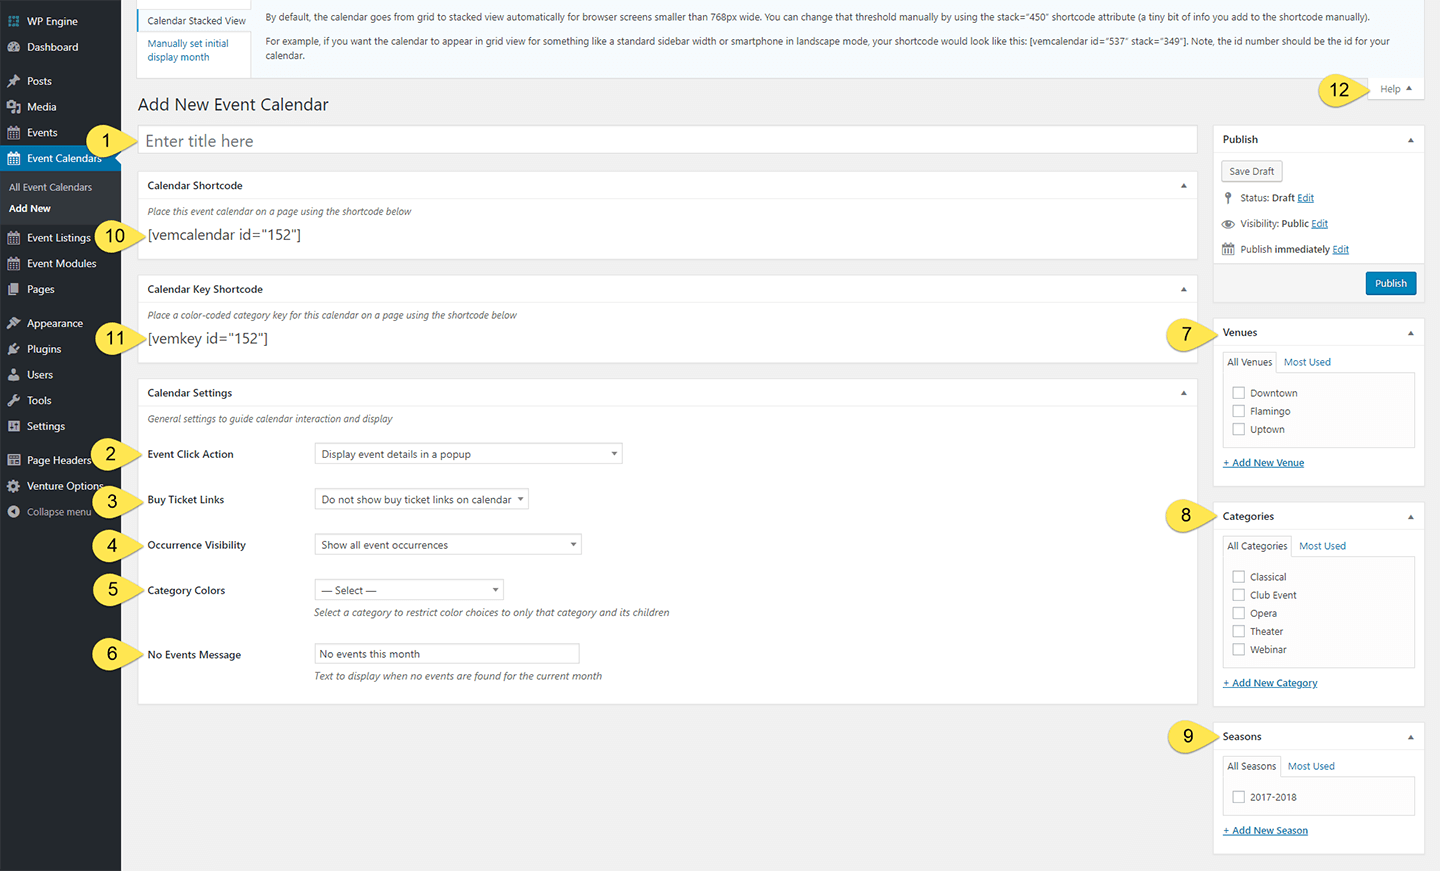
- Title: This is for admin purposes only so make use something descriptive to help identify where it is being used.
- Event Click Action: This controls what happens when a user clicks/taps on an event or occurrence inside a calendar.
- Display Event Details in popup (default).The system will show the event category (along with category color), Calendar Thumbnail image, Title, Pre/Post Title, Date, and Time info along with links to the single event page and buy tickets (if exist) URLs.
- Display event details in a panel appended below the calendar.This option shows the same info as the popup, but in a panel that slides down below the calendar.
Tip: best used in sidebars and footer widgets. - Navigate directly to single event page.This option removes all popups and slide downs and delivers the visitor directly to the single event page.
- Buy Ticket Link Display: You can show or hide all ticket purchase links from popups and slide downs.
- Occurrence Visibility: select “Show All event occurrences” or “Only show future occurrences, hide past occurrences.”
- Category Colors: select a category to restrict color choices for only that category and its children. Useful if you only want to show a single category color for all events assigned to the same parent/child category.
- No Events Message: text to display when no events are found for the current month. Text only, no HTML.
- Venues:check all that apply.
- Categories:check all that apply.
- Seasons:check all that apply.
- Calendar shortcode:you’ll use this to place the calendar inside page/post content as well as widgets.
- Calendar key shortcode:this will generate a kay that displays a category name next to the user defined color. Since the key is placed independently of the calendar shortcode, you can get creative by adding it inside a column on the right or left of the calendar as well as placing immediately above or below.
- Help: whenever applicable, a “Help” tab appears in the top, right corner of the screen. It will have all sorts of useful reference goodies; in this case, the shortcode attributes for manual calendar stacking and setting a manual view month on page load.
Using Calendars Inside Pages
- After publishing/updating your calendar, you can insert it into any page or post type by copying the “calendar shortcode.”
- Be sure you paste this into any page/post as plain text and include the opening and closing straight brackets.
- You may insert the Calendar Shortcode into Text or Custom HTML widgets (we recommend the latter as that removes some of the default CSS WordPress applies to Text widgets).
- You may use a shortcode in as many pages/posts as desired, there are no limits to how many times a shortcode may be used and if you edit it at any point, all instances throughout your site will have those changes applied in real-time.
- By default, the calendar will always occupy 100 percent of available display width.
Manually Setting Stacked View Break
By default, the calendar goes from grid to stacked view automatically for browser widths 667 pixels wide and smaller, but you can change that threshold manually by using the stack="450" shortcode attribute (a tiny bit of info you add to the shortcode manually).
For example, if you want the calendar to appear in grid view for something like a standard sidebar width (which is 350px wide), your shortcode would look like this:
[vemcalendar id="537" stack="349"]
Manually Setting Display Month On Page Load
The calendar will always load the current month by default but there are instances where you may want it to load a different month. For example, if you have a calendar that displays an event with numerous occurrences set in the event’s single event page but it doesn’t begin until a point in the future, you can set it up to open on the month with the first scheduled occurrence.
All it takes is the following attribute: start="MM/YYYY". You’ll need to use the two-digit month and four digit year format and a complete shortcode would look like this:
[vemcalendar id="537" start="07/2017"]
In that example, the calendar will always load July, 2017 as the first display month.
A Word About Caching
By default, the calendar is super sticky when it comes to caching so if you use a caching plugin and/or CDN service, you’ll want to clear those after making any changes to an existing calendar.
One of the coolest features in calendar behavior is it’s smart enough to pick up where a user left off when scrolling forward/back across months, even if they navigate away from the page.
Example: user starts in June, scrolls ahead to July, clicks through to a single event page for a July event, then uses then swipes back to the calendar page. In that scenario, the calendar will load July events becasue that’s where the user left off.